HTTP Client
The HTTP Client allows you to send HTTP requests to external servers. It can be used both for periodic data sending and for sending HTTP requests as part of the Events feature.
Starting from software version SW 1.38, the HTTP client supports multiple HTTP methods, custom headers, and request body content.
Page elements
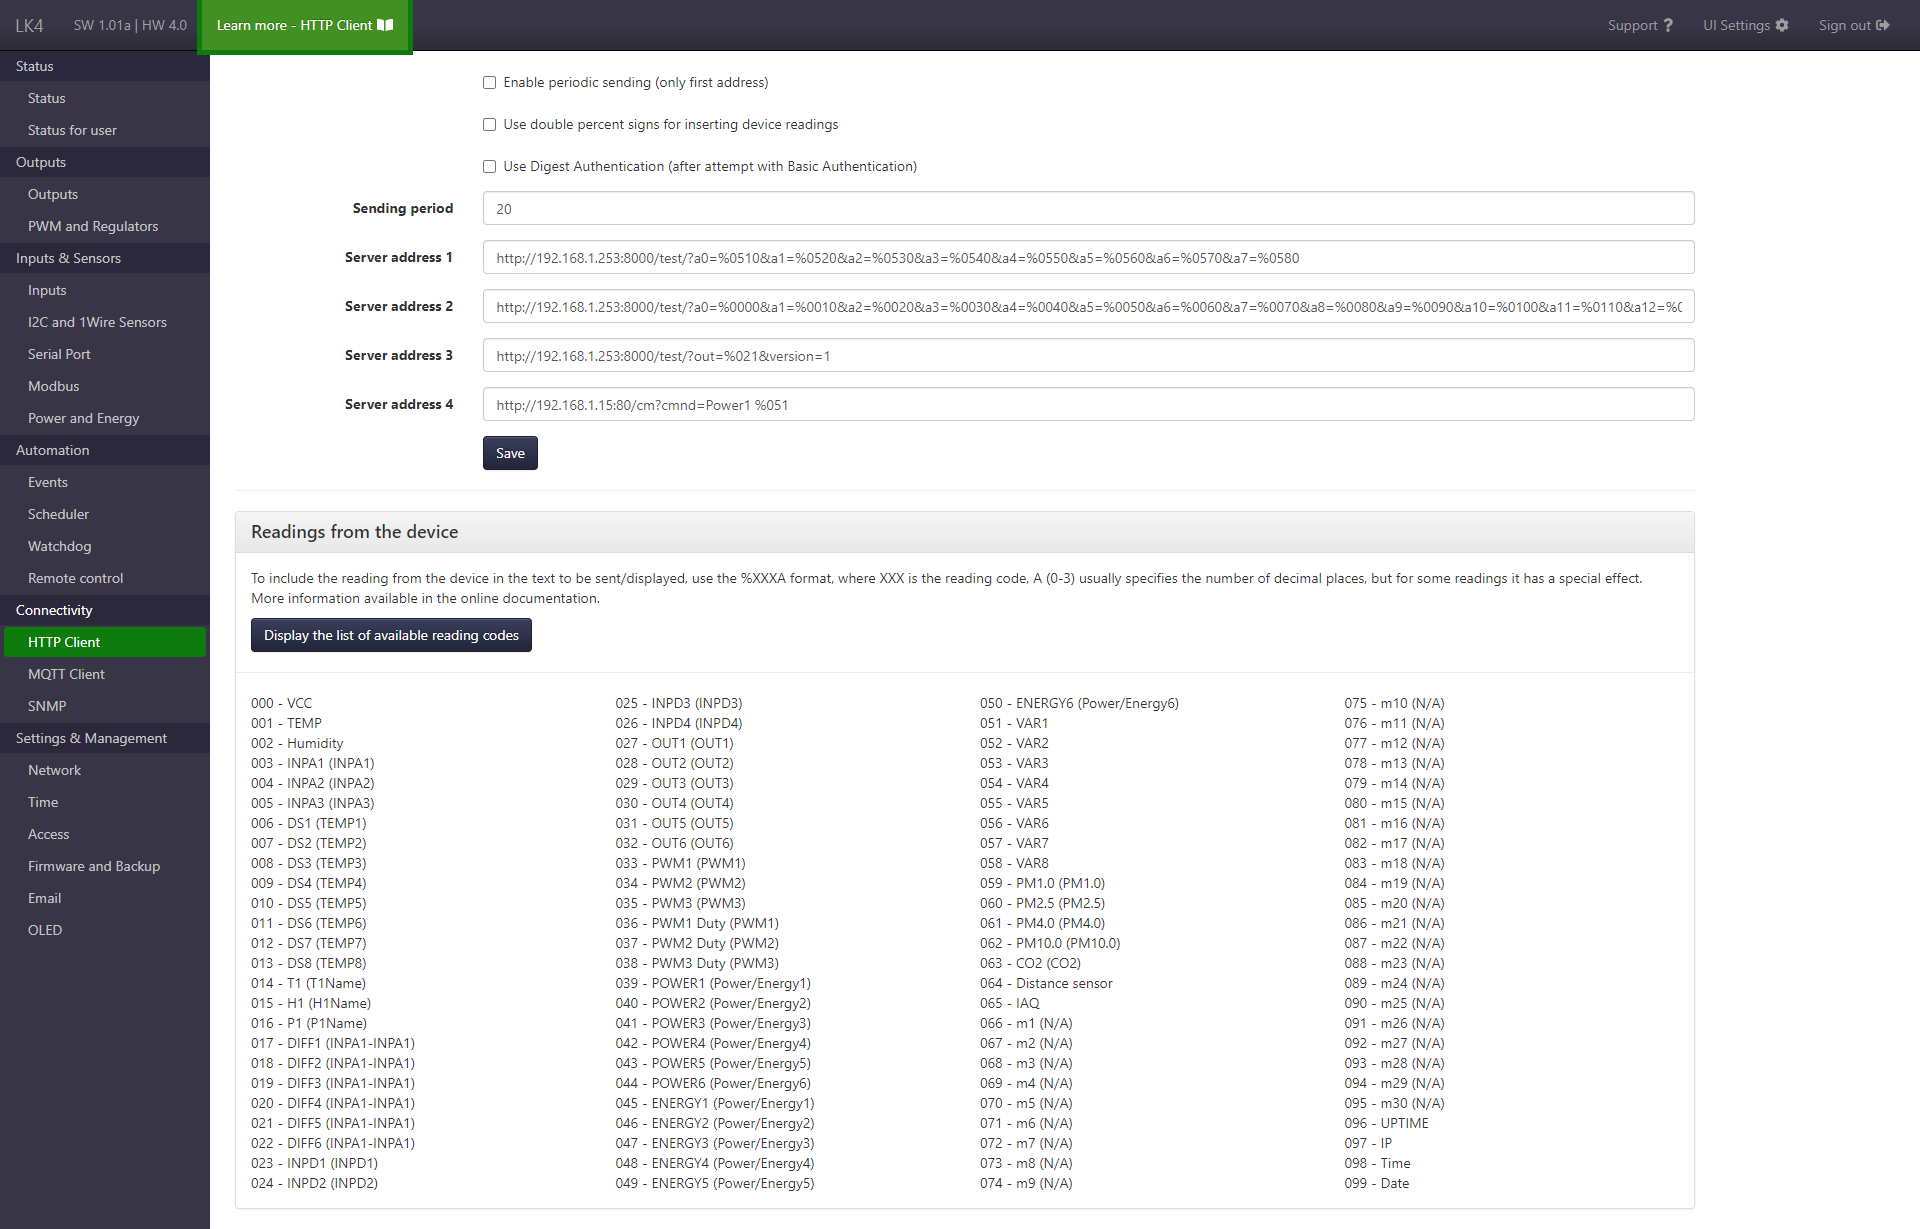
The HTTP client configuration form includes the following options:
- using a double
%character for inserting device readings (allows entering the%character), - using Digest Authentication,
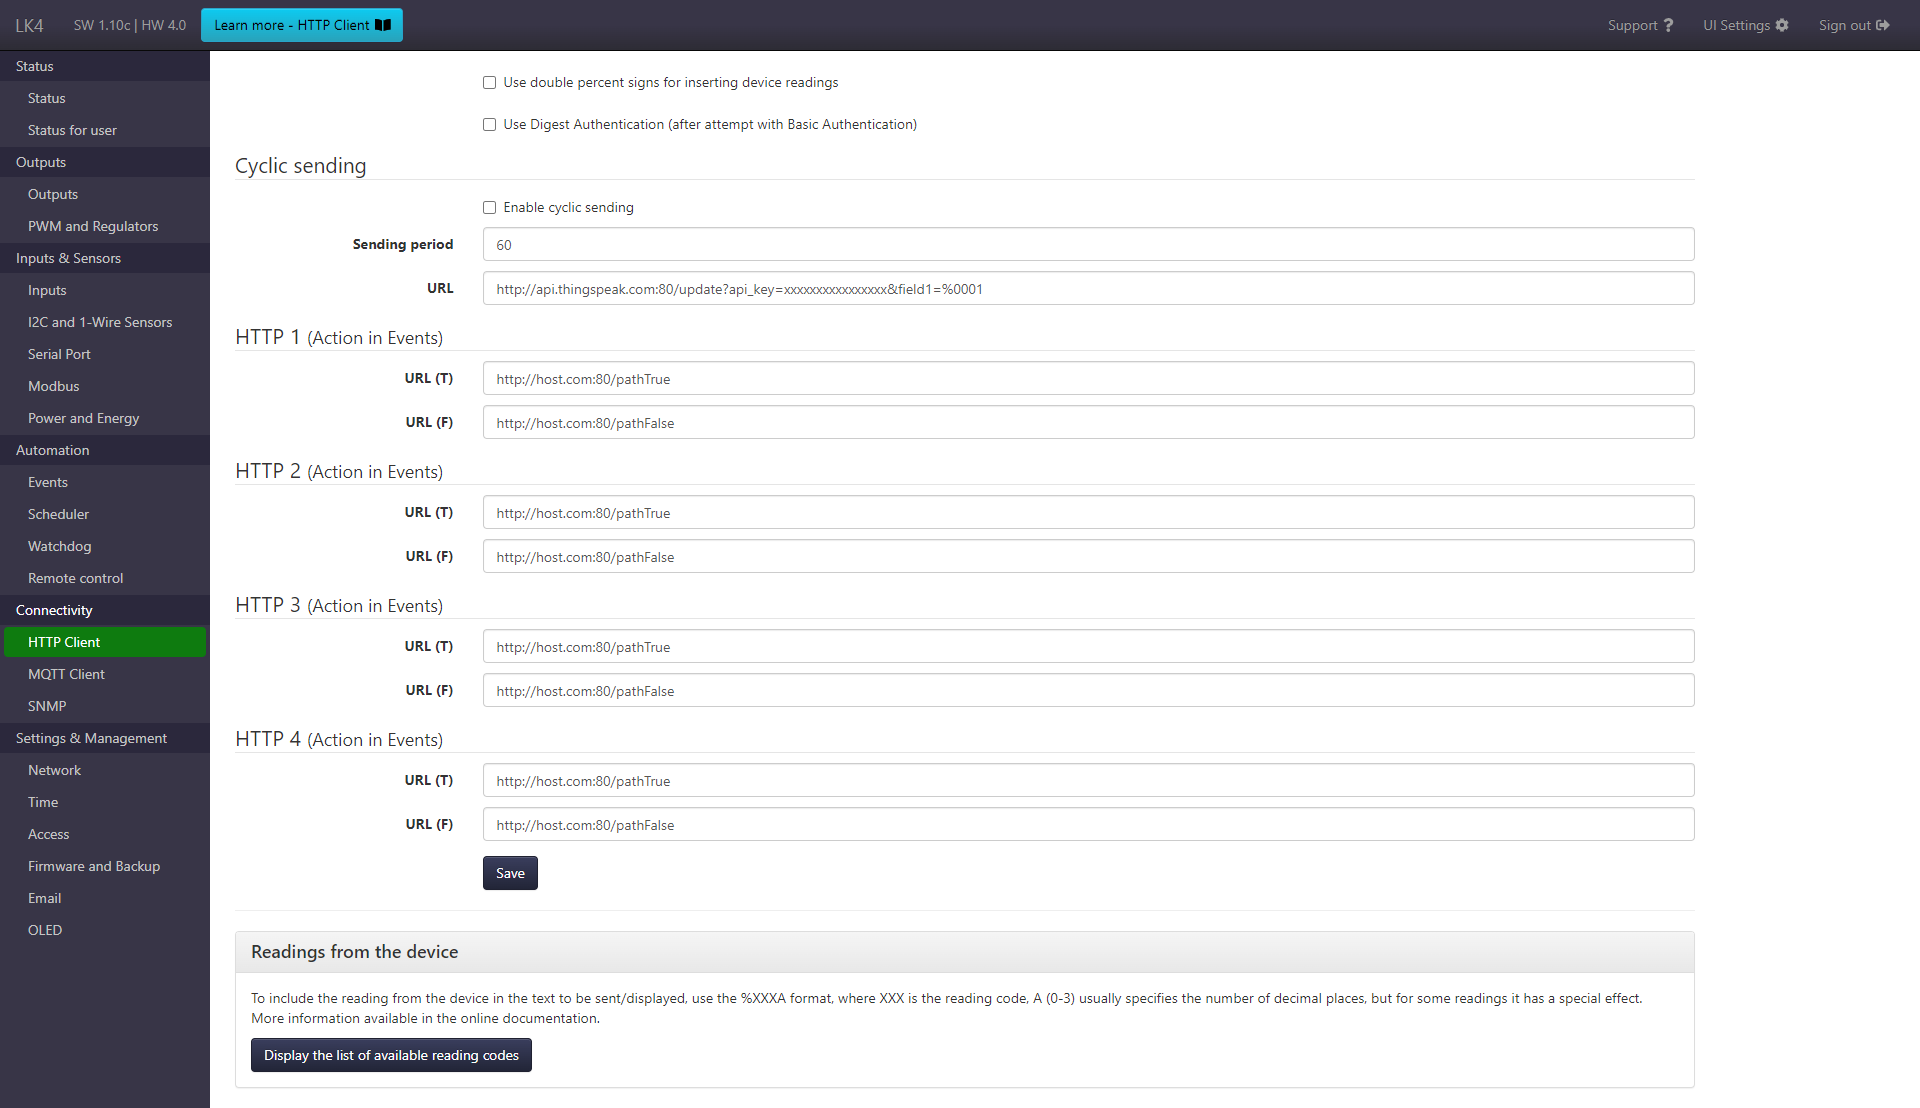
- configuration of periodic sending:
- enabling the function,
- sending interval,
- URL,
- HTTP method (available since SW 1.38),
- request headers (available since SW 1.38),
- request body (available since SW 1.38),
-
configuration of sending HTTP requests as part of the Events feature – four sections (HTTP1–HTTP4), each with two variants:
- sending when the condition is met,
- sending when the condition is no longer met,
for which the following can be configured:
- URL,
- HTTP method (available since SW 1.38),
- request headers (available since SW 1.38),
- request body (available since SW 1.38).
The option to send requests via the LTE module was removed in version SW 1.18a.
More information about this change can be found on the Modem LTE page.
HTTP client configuration
The HTTP client allows sending HTTP requests to a specified server at defined intervals or in response to conditions met in the Events feature.
Authentication
The HTTP client supports Basic Authentication and Digest Authentication.
The preferred configuration method is to provide authentication credentials in the URL field in the following form:
http(s)://username:password@domain:port/path
Based on this, the HTTP client generates the Authorization header used for Basic Authentication.
If the server requires Digest Authentication, it will be handled in the second request.
Note:
Defining a customAuthorizationheader causes the authentication mechanism based onusername:passwordprovided in the URL field to be ignored.
Digest Authentication
When the Use Digest Authentication option is enabled, the behavior of the HTTP client changes.
The first request is sent without authentication data. Then, depending on the server requirements, a subsequent request is sent using Digest Authentication or Basic Authentication.
HTTP method
The default method is GET. Starting from version SW 1.38, the following methods are also available:
- POST
- PUT
- PATCH
Methods other than GET allow sending data in the request body.
HTTP headers
Starting from version SW 1.38, it is possible to define custom HTTP headers, for example:
Content-TypeAuthorization
Headers must be provided in text format Name: value, with each header defined on a separate line.
Request body
Starting from version SW 1.38, it is possible to define a request body for the POST, PUT, and PATCH methods.
- only text content is supported (e.g. JSON, XML),
- binary data is not supported.
Inserting device readings
Current device readings can be used in the URL and request body using the special %XXXA format.
Details about reading codes can be found in the Reading codes section.
Usage examples
Example: sending data to the ThingSpeak server
The following example shows the configuration of periodic HTTP GET requests sent to the ThingSpeak server using a temperature reading.
In the periodic sending section:
- select
GETin the Request method field, - enter the following in the URL field:
http://api.thingspeak.com:80/update?api_key=H2PN0O35KRVRG6Q0&field1=%0141
As a result, the following request is sent to the server:
GET /update?api_key=H2PN0O35KRVRG6Q0&field1=26.3 HTTP/1.0
Host: api.thingspeak.com
Connection: close
The same request can be sent manually by entering the following in a web browser:
http://api.thingspeak.com/update?api_key=H2PN0O35KRVRG6Q0&field1=26.3
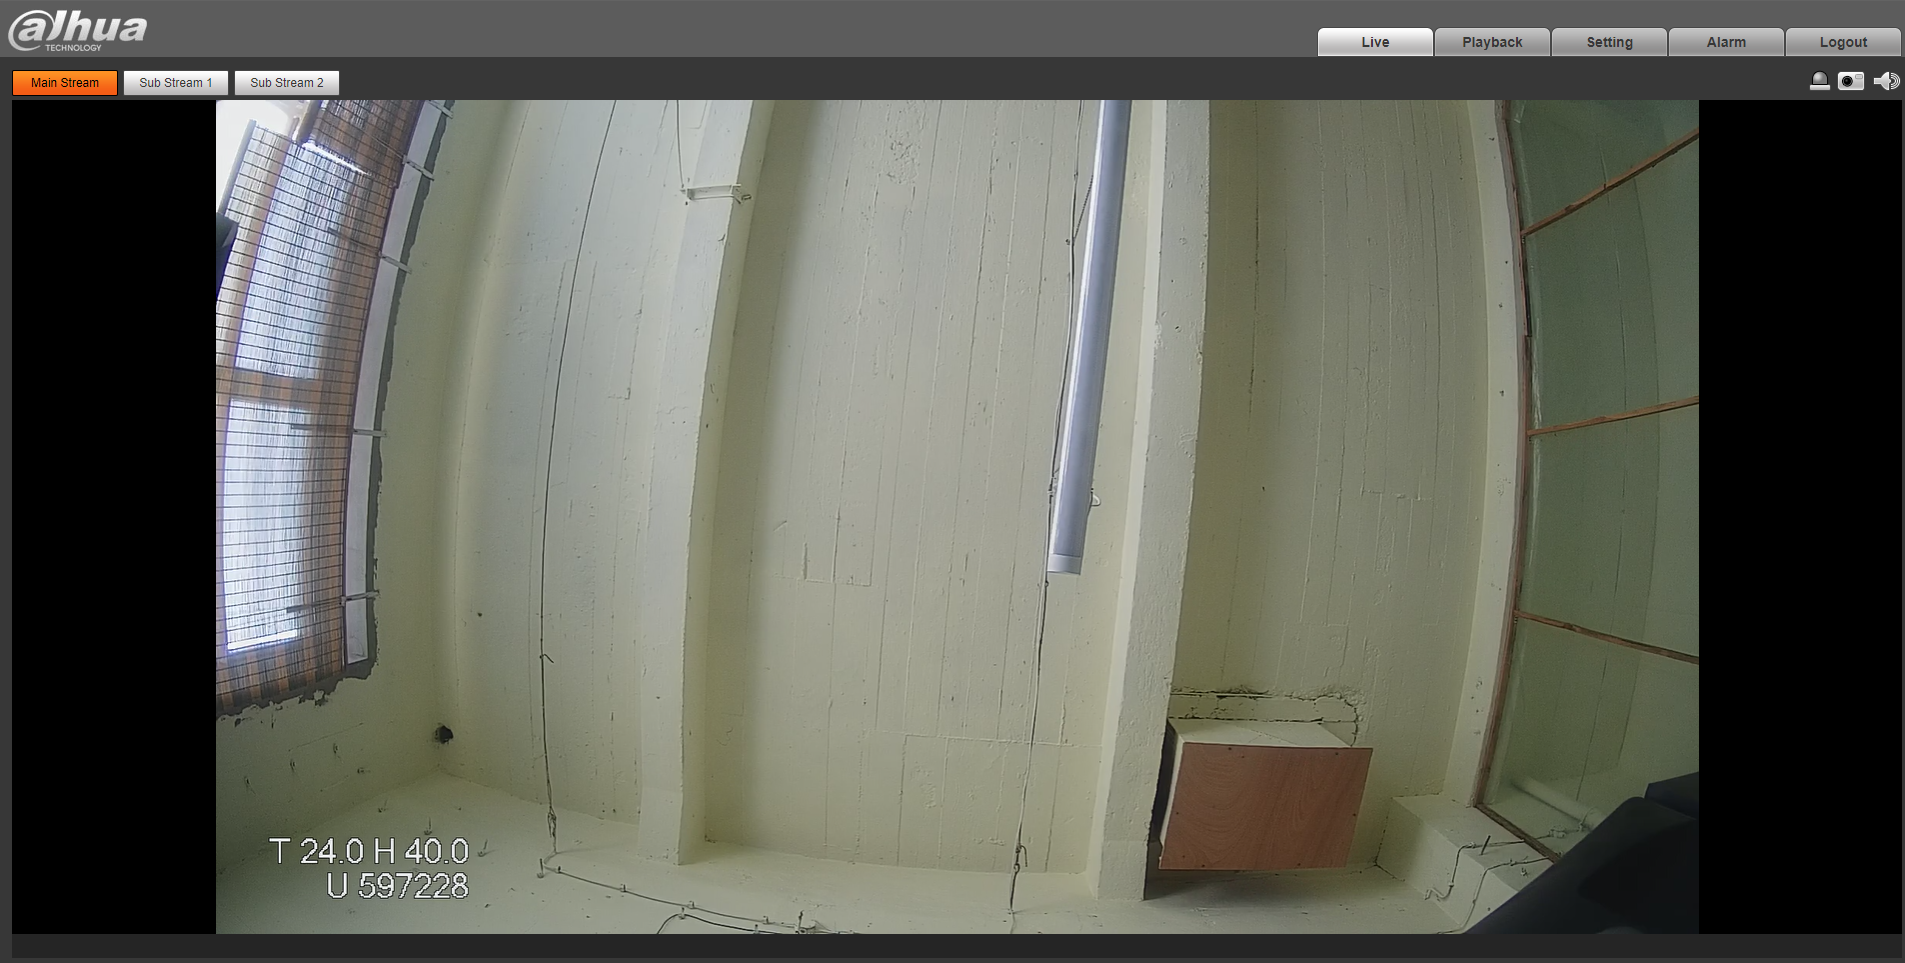
Example: using the HTTP client with a Dahua camera
The HTTP client can be used to send data (e.g. sensor readings) for display on the image from a Dahua camera.
To do this:
- enable Use Digest Authentication (since version SW 1.38, this is not required),
-
in the Periodic sending section:
- select
GETin the Request method, -
enter the following in the URL field:
http://<USERNAME>:<PASSWORD>@<CAMERA_IP_ADDRESS>:80/cgi-bin/configManager.cgi?action=setConfig&ChannelTitle[0].Name=<TEXT>Example:
http://admin:admin@192.168.1.14:80/cgi-bin/configManager.cgi?action=setConfig&ChannelTitle[0].Name=T %0141 H %0151|U %0960where: -
%0141– T1 reading (temperature), -%0151– H1 reading (humidity), -%0960– device uptime. -
enable Enable periodic sending,
- set the Sending interval, e.g. 30 seconds.
- select
As a result, the specified text will be displayed on the camera image and updated at the defined interval.
If HTTPS access is enabled on the camera (System > Safety > HTTPS), use https instead of http in the URL.
Example: sending messages via Telegram
Starting from version SW 1.24, the HTTP client can be used to send requests to the Telegram API, allowing notifications from the LK to be delivered as Telegram messages.
In this example, a bot account is used. Instructions for creating a bot can be found in the Telegram documentation.
In short, this involves sending the /newbot command in a chat with @BotFather and providing the required information.
As a result, a token will be generated, which is required to authorize the bot and send requests to the Bot API. The token consists of a sequence of digits combined with a string of a-zA-Z0-9_ characters, separated by a : character.
Next, open a chat with the created bot – this can be either a private or a group chat – and send the /start message. In response, a chat identifier (ID) will be returned, in the form of a sequence of digits, usually prefixed with the - character.
Once the required data has been obtained, the HTTP client on the LK can be configured for use with the Events feature.
In the configuration form:
- select
GETin the Request method field, -
enter the following address in the URL field (replace the text in square brackets
[]with the previously obtained data or your own text):https://api.telegram.org:443/bot[BOT ACCESS TOKEN]/sendMessage?chat_id=[CHAT ID]&text=[MESSAGE TEXT TO SEND]Example:
https://api.telegram.org:443/bot110201543:AAHdqTcvCH1vGWJxfSeofSAs0K5PALDsaw/sendMessage?chat_id=-3188255240076&text=The temperature in the office is %0141 C.
After configuring the appropriate entry in the Events feature, messages from the LK will be sent directly to the specified Telegram chat.
Reading codes
Current sensor readings and selected device parameters can be used in:
- HTTP client requests (URL and request body),
- OLED display,
- e-mail message content,
- SMS messages.
Reading code format
The reading insertion format is %XXXA, where:
%– character starting the special format,XXX– reading number expressed as a three-digit value (list of codes below),A– parameter defining the value formatting.
Parameter A
Parameter A accepts values in the range 0–3. In most cases, it specifies the number of decimal places, but for selected readings it has a special meaning:
0– no decimal places,1– one decimal place,2– two decimal places,3– three decimal places.
Special meaning of parameter A for selected readings
For some readings, parameter A has a different meaning:
- UPTIME
0– value in seconds1– value in minutes2– value in hours3– value indd-hh:mm:ssformat
- Time
0–hh:mm:ss1–hhmmss
- Date
0–yyyy-mm-dd1–yyyymmdd
- OUT1–OUT6, VAR1–VAR8, INPD1–INPD4 (OLED only)
0– text0or11– graphical state representation
Recommended values for parameter A
To keep value formatting consistent with how values are presented on the device page, the following parameter A values are recommended:
0for: OUT, PWM, INPD (iDValue), CO₂, TEMP (Board Temperature), HUM (Board Humidity),1for: T1 (i2cTemp), H1 (i2cHum), DS, PM, VCC (Board Voltage),2for: P1 (i2cPressure), INPA (iAValue),3for: POWER, ENERGY, DIFF.
List of reading codes
The full list of available reading codes is provided below.
{
    '000': 'VCC (Board Voltage)',
    '001': 'TEMP (Board Temperature)',
    '002': 'HUM (Board Humidity)',
    '003': 'INPA1',
    '004': 'INPA2',
    '005': 'INPA3',
    '006': 'DS1',
    '007': 'DS2',
    '008': 'DS3',
    '009': 'DS4',
    '010': 'DS5',
    '011': 'DS6',
    '012': 'DS7',
    '013': 'DS8',
    '014': 'T1',
    '015': 'H1',
    '016': 'P1',
    '017': 'DIFF1',
    '018': 'DIFF2',
    '019': 'DIFF3',
    '020': 'DIFF4',
    '021': 'DIFF5',
    '022': 'DIFF6',
    '023': 'INPD1',
    '024': 'INPD2',
    '025': 'INPD3',
    '026': 'INPD4',
    '027': 'OUT1',
    '028': 'OUT2',
    '029': 'OUT3',
    '030': 'OUT4',
    '031': 'OUT5',
    '032': 'OUT6',
    '033': 'PWM1',
    '034': 'PWM2',
    '035': 'PWM3',
    '036': 'PWM1 Duty',
    '037': 'PWM2 Duty',
    '038': 'PWM3 Duty',
    '039': 'POWER1',
    '040': 'POWER2',
    '041': 'POWER3',
    '042': 'POWER4',
    '043': 'POWER5',
    '044': 'POWER6',
    '045': 'ENERGY1',
    '046': 'ENERGY2',
    '047': 'ENERGY3',
    '048': 'ENERGY4',
    '049': 'ENERGY5',
    '050': 'ENERGY6',
    '051': 'VAR1',
    '052': 'VAR2',
    '053': 'VAR3',
    '054': 'VAR4',
    '055': 'VAR5',
    '056': 'VAR6',
    '057': 'VAR7',
    '058': 'VAR8',
    '059': 'PM1.0',
    '060': 'PM2.5',
    '061': 'PM4.0',
    '062': 'PM10.0',
    '063': 'CO2',
    '064': 'Distance sensor',
    '065': 'IAQ',
    '066': 'm1',
    '067': 'm2',
    '068': 'm3',
    '069': 'm4',
    '070': 'm5',
    '071': 'm6',
    '072': 'm7',
    '073': 'm8',
    '074': 'm9',
    '075': 'm10',
    '076': 'm11',
    '077': 'm12',
    '078': 'm13',
    '079': 'm14',
    '080': 'm15',
    '081': 'm16',
    '082': 'm17',
    '083': 'm18',
    '084': 'm19',
    '085': 'm20',
    '086': 'm21',
    '087': 'm22',
    '088': 'm23',
    '089': 'm24',
    '090': 'm25',
    '091': 'm26',
    '092': 'm27',
    '093': 'm28',
    '094': 'm29',
    '095': 'm30',
    '096': 'UPTIME',
    '097': 'IP',
    '098': 'Time',
    '099': 'Date',
    '100': 'Dew Point', // added in SW 1.06
    '101': 'Wi-Fi IP', // added in SW 1.38
}
The current list of reading codes is also available directly on the device page in sections where it can be used (HTTP Client, OLED, E-mail, Modem LTE).